 |

(continued)
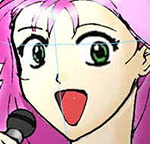
Step Four: Face Off (Model)
In the animation industry the term "off
model" refers to a character or prop which is
drawn differently than the original design. In a show,
characters being off model is a trademark of low-priced,
high-volume, low-quality subcontractors. As previously
mentioned, there is nothing wrong with interpreting a
character your own way for an illustration though. It is
a good idea not to get too far from the original feeling
of the character though.
|
 |
|
In the Eye layer I
trimmed off all the extra image besides the eyes
by selecting, clearing and erasing. I did the
same for the mouth and the nose in their
respective layers. |
 |
I looked at the Mylene reference
images and use the Free Transform
function to change the size and shape of the eyes
to be more like the original character. I sized
and stretched the mouth as well. (The rough of
the new jawline is superimposed on the old one
here.) |
 |
Then I made another layer, cfix,
for color fix up (what would be paint
retakes on a cel) and fixed the jaw and neck
areas. Eventually this layer would become the
paint layer. I recolored the mouth to look a bit
more natural. |
Step Five: The Eyes Have It
At this point I really wanted to get the eyes cleaned up
so that I could make sure the other elements were in
proportion. The eyes are a great reference for the rest
of the face and they should be done right in order that
everything else will more easily come together.
|
 |
|
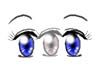
The eyes should be approximately one eye width apart, and
the rotation angle of the head should be kept in mind at all
times. |
 |
I modified them a bit so that her
head would have more of a turn to it. Since none
of the reference material had the same eye shapes
(who animated this show?!) I eventually gave up
and made them about the way I thought they should
look. I also added in the eyelid lines, which I
noted the character has in all the reference
images. |
I cleaned the lines up by sampling the color of the
skin and using it to shave down the black lines a bit,
particularly the upper eyelids. I removed all the
highlights, retouched the eye color and then repainted
new highlights. There is no hard and fast rule for
highlights and most artists use the same highlights no
matter what the lighting conditions are which is pretty
strange when you think of it. They're more part of the
design than they are real.

One of the things that was a problem in the original
was that the eyelashes weren't defined enough. This is
common when you try to paint with Photoshop style brushes
vs. Painter's watercolor brushes. The best way around it
is to put the eyes in a separate layer.
 |
|
